Changing the Settings on Your Dimmer
Our LED dimmer modules have two settings you can adjust yourself: the minimum brightness, and the driving mode (trailing edge or leading edge). Both are changed using the dimmer knob alone — no tools, and no need to remove the plate.
If your dimmer flickers when turned down low, won't dim as far as you'd like, or buzzes, one of these two settings will usually fix it. It's worth trying before assuming the dimmer or the lamps are faulty.
First, check which module you have. If the module in the back of your dimmer has V-Pro printed on it, it's a Varilight Professional module — we fitted these for a number of years before moving to our current modules, so there are plenty still in use. The procedure is different, and it's covered in our separate guide to changing the settings on Varilight V-Pro dimmers. Everything below applies to our current dimmer modules.
Adjusting the minimum brightness
Use this if the lights flicker when dimmed to a low level, or if the lowest setting is still brighter than you want it.
- Switch the light on and turn the dimmer knob to the minimum position (fully anticlockwise).
- Press the knob six times.
- The lights will step up and down in brightness to confirm the dimmer is in configuration mode.
- Slowly adjust the knob to the brightness you want as the new minimum, and leave it there.
- After about three seconds the dimmer registers that you've stopped adjusting. The lights will step up and down again to confirm it has saved the setting and returned to normal operation.
Changing the driving mode
Your dimmer leaves the factory in trailing edge mode, which suits most dimmable LEDs. Some LED lamps perform better on leading edge control, so if you're getting flickering or buzzing that adjusting the minimum brightness hasn't cured, it's worth trying the other mode.
- Switch the light on and turn the dimmer knob to the maximum position (fully clockwise).
- Press the knob six times.
- The lights will step up and down in brightness to confirm the dimmer is in configuration mode.
- To keep or return to the factory default of trailing edge, leave the knob at maximum and wait a few seconds until the lights stop changing.
- To select leading edge, turn the knob fully anticlockwise and leave it there for a couple of seconds.
For an explanation of what the two modes actually do, see our guide to how dimmers work.
How many LED lamps can I put on one dimmer?
Fewer than the headline wattage suggests. LED lamps don't load a dimmer in a straightforward way, so the rated maximum has to be de-rated for LEDs. As a guide, between one and ten dimmable LED lamps per gang will work well on a single dimmer circuit.
| Lamp type | 250W dimmer | 400W dimmer |
|---|---|---|
| Incandescent | 40W–250W | 40W–400W |
| Halogen | 250W | 400W |
| Dimmable LED | 1–10 fittings, 5W–100W total | 1–10 fittings, 5W–150W total |
| Low voltage halogen | 200W | 300W |
Maximum and minimum loads vary by the make and type of LED, so check the lamp manufacturer's own loading information where you can. Our guide to working out the load on your dimmer covers the calculation in more detail.
Choosing lamps that will actually dim
The lamp has to be specified as a dimmable LED. A standard non-dimmable LED won't dim on any dimmer, however well configured. It's also worth sticking to established lamp brands: "dimmable" is a claim on the box rather than a standard, and we can't guarantee every lamp labelled dimmable will dim satisfactorily.
Do not use these dimmers with wire-wound or toroidal transformers.
Overload protection
The dimmer is protected against overload and resets automatically. If it's overloaded it will switch itself off. Remove whatever caused the overload, switch the dimmer off and back on again, and it will resume normal operation. A short circuit is different and can damage the module beyond repair.
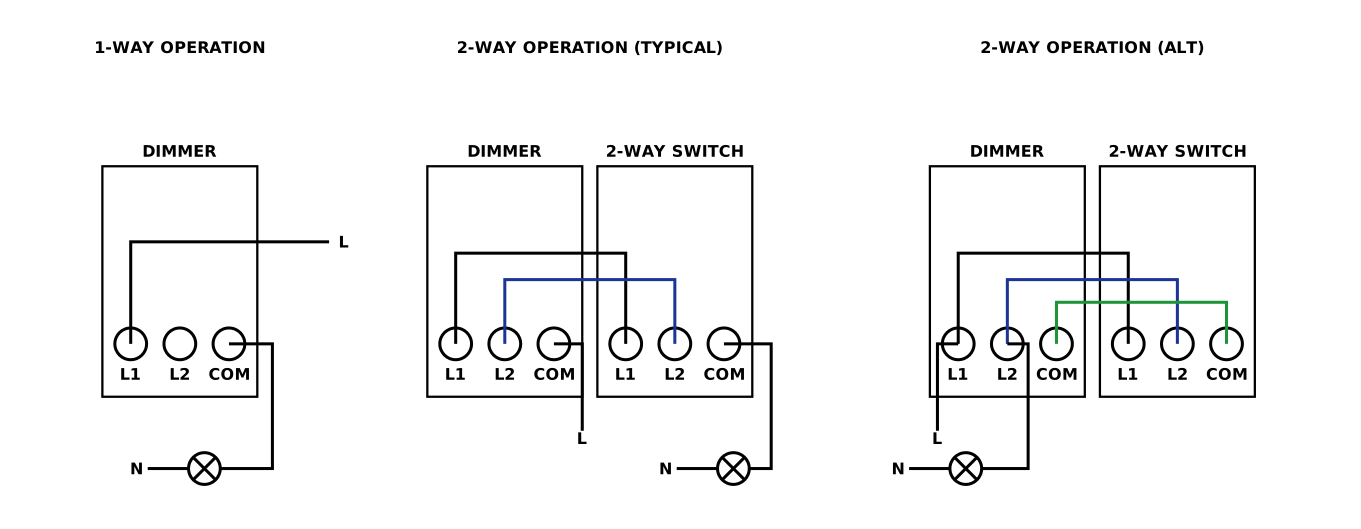
1-way and 2-way wiring
The dimmer has three terminals — L1, L2 and COM — and works in either a 1-way or a 2-way circuit. The wiring is the same whether you have a 250W or a 400W module; only the load limits differ.
For 1-way, the live feed goes to L1 and the load to COM.
For 2-way there are two arrangements, and we'd suggest the typical one unless you have a specific reason not to. Live to COM on the first dimmer, L1 and L2 strapped across to L1 and L2 on the second, and the load taken from COM on the second. It's the standard arrangement, it's easier to follow, and it's what an electrician will expect to find when the plate next comes off.
The alternative arrangement straps all three terminals across, takes the live from L1 and the load from L2. It exists mainly for converting an existing 1-way switch to 2-way: if the feed and load are already terminated on L1 and L2, you can add the second switch without disturbing them. That can be worth having in a shallow box with short tails. For a new installation, or anywhere you're happy to re-terminate, the typical method is the better choice.
Installation
Installation should follow the wiring instructions supplied with the dimmer, and if you're in any doubt, use a qualified electrician. Incorrect installation can damage the dimmer beyond repair. A few points worth knowing:
- Isolate the supply at the mains before starting, either at the consumer unit or by removing the appropriate fuse. Wiring should comply with the current edition of BS 7671.
- Note the existing wiring before you disconnect it. Where two or more wires share a terminal in the old switch, they must stay together in the new one.
- The wall box needs to be at least 25mm deep and free of plaster and projecting screw heads.
- Metal front plates must be earthed.
- Don't trap wiring between the back of the dimmer and the back of the wall box, and don't overtighten the plate screws, which can distort or crack the plate.
- Grid dimmer modules assemble differently, clipping into a grid frame and holder before the frame goes onto the wall. The instructions supplied with grid modules cover this.
One thing that catches people out: don't fit a metal faceplate directly onto a freshly plastered or damp wall, as the finish can tarnish. Use a sheet of polythene as a temporary gasket until the wall has dried out, and avoid masking tape, which can mark the plate.
Frequently Asked Questions
Why do my LED lights flicker when dimmed low?
Usually because the dimmer's minimum brightness is set below the level your lamps can run at reliably. Raising the minimum brightness setting normally cures it. If it doesn't, try switching the driving mode.
How do I put my dimmer into configuration mode?
Turn the knob to either minimum or maximum, depending on which setting you want to change, then press the knob six times. The lights stepping up and down in brightness confirms configuration mode.
What is the difference between trailing edge and leading edge?
They clip the mains waveform at different points. Trailing edge suits LED and CFL lamps and is our factory default. Leading edge is the older technology, designed for incandescent and halogen lamps, though some LEDs do run better on it.
How do I reset my dimmer to factory settings?
Turn the knob to maximum, press it six times, then leave the knob at maximum for a few seconds. That returns the dimmer to trailing edge mode.
Should I use the typical or the alternative 2-way wiring?
The typical arrangement for anything new. The alternative exists mainly for converting an existing 1-way switch to 2-way, where it saves disturbing terminations that have already been made.
My dimmer has V-Pro on the back — do these instructions apply?
No. V-Pro modules are Varilight Professional modules, which we fitted for several years and which use a different procedure. See our guide to changing the settings on Varilight V-Pro dimmers.
Related guides: are our dimmers compatible with LED lamps? and what kind of dimmer is needed for LED lights?